Recently, I worked on the following two problems on a Vista machine with a recently updated Internet Explorer browser (from 8 to 9) that had two problems. One, when closing a tab or the Internet Explorer 9 window I would get the following popup message: Internet Explorer has stopped working. That wasn't an intermittent problem. It happened every single time a tab or the window closed. I couldn't blame the user for being annoyed by this. The other problem was when he clicked on the IE shortcut in the taskbar or on the desktop, IE would open in a tiny rectangle box instead of opening maximized.
First, how to fix the "internet explorer has stopped working" error.
Open Internet Explorer. Then click on the gear icon in the top right window to make the Tools menu appear. Then
click on internet options to bring up the internet options menu. Click on the
advanced tab and check the box under "accelerated graphics" called "use software
rendering…" Make sure that is checked then click OK and reboot. After the reboot Internet Explorer worked correctly.
While the above solution worked for my situation, it doesn't fix every situation. You may have an IE startup process that is causing the problem too. In the past I've used autoruns, a handy tool, to find those nasty processes in IE startup and delete them, fixing not only the error after closing IE but also improving overall IE performance. Installing toolbars, addons, etc. often cripples your web browser's performance and can cause weird problems like the error message we focused on in this post.
Now about the "maximize when opened" solution. There are different solutions for this problem. What worked for this situation I'll offer then I'll follow that with some other possible solutions.
Open Internet Explorer and size the window to your liking. Then hold down the ctrl key while clicking the red “x” to close the program. This will set the
IE window to open at this setting every time. To makes sure other links
and such open the same way dick on the gear icon like you did earlier, click internet options,click
"tabs", then select "always
open pop-ups in a new tab." Click OK once then one more time in the previous window. I will also say this worked on a Vista machine. I don't know if that makes a difference or not. I do know this next method worked on Windows 7 machines but didn't work on this Vista machine. It's very simple. Open Internet Explorer then click and drag the window to the top of the monitor. It will be maximized. Close it then reopen it and the window should open maximized. That solution worked on a few Windows 7 machines in the past.
There's one more I'll detail below.
Go the the desktop and right click on the desktop, click new, then shortcut. Create a short cut to "Program Files/Internet Explorer/iexplore.exe" Right click on the short cut and then select Properties. Click on the tab "Shortcut" and then change the value in the run command to "maximized". Click apply then OK. Now Internet Explorer will open in the maximized state when you click on any short cut to iexplore.exe.
So there you have it! If you have any questions comment below.
Showing posts with label Windows. Show all posts
Showing posts with label Windows. Show all posts
Thursday, October 17, 2013

Friday, October 11, 2013
How to restore Windows 7 default "desktop" folder
Here is a quick tip on fixing the path for your desktop folder when the easy method of right-click > Properties > Location doesn't work.
Go into the Registry Editor (Start > search > regedit). When Registry Editor opens go to HKEY_CURRENT_USER\Software\Microsoft\Windows\CurrentVersion\Explorer\User Shell Folders
Over on the right you should see "Desktop." Double-click the "Desktop" entry. A window will open displaying the value "Desktop" and "Value Data" (the path to the desktop folder). Now, if you want to put in the correct path (C:\Users\Username\Desktop) for your desktop folder or your desired path this is where you would input it then log out and log back in for the setting to take effect.
Go into the Registry Editor (Start > search > regedit). When Registry Editor opens go to HKEY_CURRENT_USER\Software\Microsoft\Windows\CurrentVersion\Explorer\User Shell Folders
Over on the right you should see "Desktop." Double-click the "Desktop" entry. A window will open displaying the value "Desktop" and "Value Data" (the path to the desktop folder). Now, if you want to put in the correct path (C:\Users\Username\Desktop) for your desktop folder or your desired path this is where you would input it then log out and log back in for the setting to take effect.
Friday, April 5, 2013
Windows 7 SP1 not offered in Windows Update? Dude what's up with that?

Dude, what's up with that? Is that correct response. You're mad at Microsoft. "Everyone else is getting it! Why am I not?" You fold your arms, pooch out your bottom lip and give Microsoft the most evil stare of all time. Of all time!
Maybe it's not Microsoft. Maybe. I encountered this problem on a machine this week. I was doing my, ahem, weekly (okay maybe monthly...er...) checks on the machines in the network. I noticed one didn't have Windows 7 Pro SP1.
What?
That was released a loooong time back. For the shop the machine is in, I have automatic Windows Updates set. I noticed the other handful of machines were all up to date and yes, this machine was still "up to date," but not SP1 "up to date." What to do? Scouring Microsoft support I found an article with some helpful information. This article gives six methods on how to receive the SP1 update if it's not offered in Windows Update.
Method 1: Confirm that Windows 7 SP1 is not already installed and that you are not running a prerelease version of Windows 7 SP1
Method 2: Check for pending updates
Method 3: Verify that an incompatible version of SafeCentral is not installed on your computer
Method 4: Check whether you have Intel integrated graphics driver Igdkmd32.sys or Igdkmd64.sys and whether you upgraded the driver
Method 5: Make sure that you did not use vLite to customize your Windows 7 installation
Method 6: Download the Windows 7 SP1 from Microsoft Download Center
Method 4 worked for me. The machine had the integrated graphics driver and the update for that driver was in the "optional updates" section of Windows Update so it wasn't installed automatically.

After running the driver update for the integrated graphics and a reboot, the SP1 update was offered as an update. That's fresh if you ask me.
Now, you might say, "That's nice, but I don't have Intel GMA or anything else recommended to check in the methods. What now?" Still, the driver might be installed and disabled which is why it's not showing in DxDiag. It might be that at one time you used the onboard graphics which means the Intel driver was installed on the machine but you disabled it because you added a graphics card. The driver is still installed, if that is the case, and Windows is seeing that driver thus not offering you the SP1 update.
Go into your BIOS and enable the onboard graphics again.
Reboot.
Check for updates in Windows update.
The Intel driver will most likely show up.
Install the update.
Reboot.
Search for Windows updates.
SP1 should be offered now.
Install it and the many other updates offered after reboot.
Rejoice.
Wednesday, March 27, 2013
Customize an RDP file for a Specific RDWeb user
Do you have some rdweb users who would like to rdp to their desktop from the rdweb portal, but are uncomfortable with the method used in the rdweb portal? It's kind of a long process to login to rdweb, mouse over to 'remote desktop' then plug in the desktop information, etc. What if the user had an rdp file that looked and acted like an app in the remoteapps list? That would be great you say? Then let's do it.
*There might be an easier way than this and if there is please let me know about it*
First, launch remote desktop connection.
Input the user specific information in the fields.
Second, save it as an rdp file.
Third, (only do this if your user's desktop has dual-monitors) open the rdp file in notepad to add some information.
If you user's desktop has dual monitors and the system is Windows 7 ultimate or enterprise then add the following to the end of the rdp file that is opened in notepad: use multimon:i:1
If the users' desktop has dual monitors and running pre-Windows 7 ultimate or enterprise (e.g., windows 7 pro or Windows Vista) then add the following to the end of the rdp file: span monitors:i:1
What is the difference between span and multimon?
From MSDN blog
"Span mode, introduced in Vista, allows the remote desktop to span across all monitors on the client as long as the monitors are arranged to form a rectangle. The remote session created when using span mode is still a single-monitor session. With multimon support, each monitor on the client machine is viewed as a distinct monitor in the remote session. Due to this fundamental difference, span mode has some restrictions that true multimon does not:
1. The primary monitor must be leftmost.
2. The set of monitors must form a rectangle (i.e. identical vertical resolution, and lined up in exact straight line).
3. The total of the resolutions must be below 4096x2048 (ex. 1600x1200+1600x1200 = 3200x1200)."
Multimon "...for Remote Desktop Services allows users to open a Remote Desktop connection expanded across all the monitors on the client computer regardless of the client monitor configuration. With this feature, the user can fully utilize all the monitors connected to the client computer for the Remote Desktop connection thereby providing extra desktop space and an almost seamless experience with the client desktop that is much improved over “Span mode”. "
Fourth, add the rdp file to the remoteapp programs list in your rdweb server.
Go to "remoteapp manger."
Click "add remoteapp programs."
Next.
Browse.
Make sure "all files (*.*)" is selected in the dropdown box. After you've found your custom rdp file select Open.
Next and finish.
Fifth, customize view permissions for the rdp file.
Under remoteapp programs in remoteapp manger, right click the rdp file then select properties. Select user assignment then select "specified domain users and domain groups." Click add. Since this is a specific user rdp file select the appropriate user profile for the rdp file.
OK it.
Then OK in remoteapp properties.
Now, say all of this was for Jane Austen. She will login to the RDWeb portal, see the file you've added to remoteapp programs for her profile, run it then have access to her work desktop. This is much easier compared to the default route.
*There might be an easier way than this and if there is please let me know about it*
First, launch remote desktop connection.
Input the user specific information in the fields.
Second, save it as an rdp file.
Third, (only do this if your user's desktop has dual-monitors) open the rdp file in notepad to add some information.
If you user's desktop has dual monitors and the system is Windows 7 ultimate or enterprise then add the following to the end of the rdp file that is opened in notepad: use multimon:i:1
If the users' desktop has dual monitors and running pre-Windows 7 ultimate or enterprise (e.g., windows 7 pro or Windows Vista) then add the following to the end of the rdp file: span monitors:i:1
What is the difference between span and multimon?
From MSDN blog
"Span mode, introduced in Vista, allows the remote desktop to span across all monitors on the client as long as the monitors are arranged to form a rectangle. The remote session created when using span mode is still a single-monitor session. With multimon support, each monitor on the client machine is viewed as a distinct monitor in the remote session. Due to this fundamental difference, span mode has some restrictions that true multimon does not:
1. The primary monitor must be leftmost.
2. The set of monitors must form a rectangle (i.e. identical vertical resolution, and lined up in exact straight line).
3. The total of the resolutions must be below 4096x2048 (ex. 1600x1200+1600x1200 = 3200x1200)."
Multimon "...for Remote Desktop Services allows users to open a Remote Desktop connection expanded across all the monitors on the client computer regardless of the client monitor configuration. With this feature, the user can fully utilize all the monitors connected to the client computer for the Remote Desktop connection thereby providing extra desktop space and an almost seamless experience with the client desktop that is much improved over “Span mode”. "
Fourth, add the rdp file to the remoteapp programs list in your rdweb server.
Go to "remoteapp manger."
Click "add remoteapp programs."
Next.
Browse.
Make sure "all files (*.*)" is selected in the dropdown box. After you've found your custom rdp file select Open.
Next and finish.
Fifth, customize view permissions for the rdp file.
Under remoteapp programs in remoteapp manger, right click the rdp file then select properties. Select user assignment then select "specified domain users and domain groups." Click add. Since this is a specific user rdp file select the appropriate user profile for the rdp file.
OK it.
Then OK in remoteapp properties.
Now, say all of this was for Jane Austen. She will login to the RDWeb portal, see the file you've added to remoteapp programs for her profile, run it then have access to her work desktop. This is much easier compared to the default route.
Monday, March 25, 2013
Make file explorer available in RDWeb

I thought this was pretty cool. This may not be anything new for RDWeb pros, but I discovered this possibility the other day and thought, "Why not share this on my blog?"
First things first: I haven't found a way to make the file explorer match the logged in user's profile, e.g. if jausten logs in to RDWeb, runs file explorer then she will see all of the available folders instead of only seeing her own documents folder. Why? Because this file explorer is the file explorer on the RDWeb server instead of the file explorer that is in jausten's ad profile. Make sense?
Login to your RDWeb server.
Launch remoteapp manager.
Click add remoteapp program.
In the "choose programs to add to the..." window, click browse
In the "choose a program" explorer window browser to c:\windows then choose explorer.exe
Next
Finish
File explorer is now a part of the remoteapp programs on your RDWeb site. Cool. Just remember to tell your users not to treat the file explorer as their work drive for their own documents. Then why add the file explorer to the remoteapps list? Example: if your rdweb users are on a team then they can share their project files there.There are other examples I'm sure.
Please let me know if you are going to or have done anything with file explorer in rdweb beyond what I have done in this blog post. I would like to hear about it.
Tuesday, March 5, 2013
Currently Reading Training Guide: Configuring Windows 8

Training Guide: Configuring Windows 8
The authors clearly know their subject. I've learned a lot from this book on how to implement Windows 8 in the enterprise and SMB. Lessons, practices, and exercises are the model and the authors have worked this model in an excellent way. The writing is top notch as well. Tech books have an image (no pun intended) of bad writing, i.e., dry, only writing what's necessary, but that can't be said of this book. The writing keeps me interested.
I'm only about 1/4 of the way through the book and what's funny is I don't want it to be over. I actually look forward to studying this book and doing the exercises. I highly recommend this book for the IT professional wanting an understanding of how to roll out then maintain Windows 8 in the business level and for the geek who just wants to know how it works.
When I'm finished with the book I plan on writing a full review.
Monday, December 10, 2012
.NET 4 Full Install Saved The Day
Last week ended well. A remote user has been using a work app in an odd way and now she can finally use it 99% just like the users at our main site. Cool. Before, I had her connecting to our main site via Sonicwall Global VPN client, then using RDP to a virtual machine. No, it's not a horrible way to use the app, but it's not the best. Why did I have her setup this way? I'll explain.
Our application we use for HR, payroll, general ledger, project management, etc. runs from serer1. It's installed on that server. Our main site users have a mapped drive to server1 and a shortcut to the app on their desktops. They click on the shortcut, and since the app is web based, IE 8/9 pops up with the app graphic and a link for the database to connect to. Once the database link is clicked, the login window pops up for the user to put in her credentials then away she goes working. That's how the run process, well, runs. For the remote user, I had in mind the following: connect via vpn then use the app just like users at the main do. Well, my setup didn't go as planned. Earlier this year when I setup the remote user for app use, I ran the sonicwall vpn global client to connect to our main site. I mapped the drive to server1, placed the shortcut to the app on her desktop, clicked on it, ran the config, the IE app graphic window popped up, I clicked on the database link, but then nothing happened after that. Nothing. I clicked again and nothing. I at least expected an error message, but I wasn't given anything. The user was pressed for time. I asked her if I could investigate, that it could probably take a lot of time and she more or less said "no." I told her I could make a quick fix and she was fine with that. So, I setup the RDP method. She was fine with that and she had been fine with that for many months.
Last week she reminded me about it and wondered if I could eliminate the remote step. I told her it would probably take some time and she was fine with that. I setup a lab in my office, almost identical to her setup (the only difference was my connection was wireless). In my lab an error message displayed on the screen. I clicked on the database link, then BAM an error message popped up reporting an app crash. I flew to the event viewer and found an application crash reported. I then decided to compare and contrast my lab setup and our production setup. I found a difference (besides the vpn connection, :P): our production computers had .NET Framework 4 Extended and Client Profile whereas my lab computer only had .NET Framework 4 Client Profile. So, I installed .NET 4 Full on my lab computer and after that the app worked flawlessly.
I then called the remote user, setup a time, went out there installed .NET 4 full and then the app worked exactly as it should have worked. The user was ecstatic. I had never seen her so happy. She told me she didn't mind going through the RDP, but the text was small, the connection would timeout after inactivity; just those little things that don't ruin your work, but are just so annoying you can't work happily you know? Well, so far, so great for her current setup. All she has to do now is run the sonicwall global vpn client then she is able to work within the app.
Any suggestions for an alternate setup?
Our application we use for HR, payroll, general ledger, project management, etc. runs from serer1. It's installed on that server. Our main site users have a mapped drive to server1 and a shortcut to the app on their desktops. They click on the shortcut, and since the app is web based, IE 8/9 pops up with the app graphic and a link for the database to connect to. Once the database link is clicked, the login window pops up for the user to put in her credentials then away she goes working. That's how the run process, well, runs. For the remote user, I had in mind the following: connect via vpn then use the app just like users at the main do. Well, my setup didn't go as planned. Earlier this year when I setup the remote user for app use, I ran the sonicwall vpn global client to connect to our main site. I mapped the drive to server1, placed the shortcut to the app on her desktop, clicked on it, ran the config, the IE app graphic window popped up, I clicked on the database link, but then nothing happened after that. Nothing. I clicked again and nothing. I at least expected an error message, but I wasn't given anything. The user was pressed for time. I asked her if I could investigate, that it could probably take a lot of time and she more or less said "no." I told her I could make a quick fix and she was fine with that. So, I setup the RDP method. She was fine with that and she had been fine with that for many months.
Last week she reminded me about it and wondered if I could eliminate the remote step. I told her it would probably take some time and she was fine with that. I setup a lab in my office, almost identical to her setup (the only difference was my connection was wireless). In my lab an error message displayed on the screen. I clicked on the database link, then BAM an error message popped up reporting an app crash. I flew to the event viewer and found an application crash reported. I then decided to compare and contrast my lab setup and our production setup. I found a difference (besides the vpn connection, :P): our production computers had .NET Framework 4 Extended and Client Profile whereas my lab computer only had .NET Framework 4 Client Profile. So, I installed .NET 4 Full on my lab computer and after that the app worked flawlessly.
I then called the remote user, setup a time, went out there installed .NET 4 full and then the app worked exactly as it should have worked. The user was ecstatic. I had never seen her so happy. She told me she didn't mind going through the RDP, but the text was small, the connection would timeout after inactivity; just those little things that don't ruin your work, but are just so annoying you can't work happily you know? Well, so far, so great for her current setup. All she has to do now is run the sonicwall global vpn client then she is able to work within the app.
Any suggestions for an alternate setup?
Tuesday, December 4, 2012
Screen Resolution Problem and Enlarged Text
Interesting problem yesterday. I have clients who run surveillance camera software (CMS) on their computers. The software pulls the feed from their networked dvr system. The network has mixed client hardware, i.e., each client has different monitors and a different workstation (though I've almost got each client the same workstation now), so I installed the CMS software to match the client's screen resolution choice. After setup, there have been no problems with the CMS configuration for many months.
Yesterday, I received a call from one of the clients. He told me when he clicked on the CMS icon a window appeared with a message "screen resolution must be at least 1024 x 768." I asked him to please check his resolution, walked him through that process and, no surprise, found out his monitors (he has two) both have that resolution. I'm not far from the client so I just made the walk over to his office. I checked the resolution to just knock that off my troubleshooting list and I couldn't believe that CMS still wouldn't run. I was truly bamboozled. Windows screen resolution is 1024 x 768, but CMS wouldn't run because the resolution had to at least be 1024 x 768? Confusing. It was just confusing.
He has an nvidia video card with a control panel. So, I checked that just out of curiosity and obviously the resolution there matched Windows. I checked the Windows Update history. He said CMS worked just fine Friday. Their systems do windows updates over the weekend, so I thought maybe there had been a big update or something. The only update over the weekend was an update for Windows Defender. To my knowledge, that wouldn't have anything to do with my problem. After drumming my fingers for a little bit, I decided to reinstall the software sine it's a simple install. I reinstalled the software hoping that would fix the issue. It didn't. I truly didn't know what to do. Trying not to panic, I went through my history list with this system (these are very helpful) and found that when setting up the system I enlarged the display text to the maximum size, which is 150%. I checked the text size and it was still set to 150%. I turned it down to medium 125%, logged off then logged back in and clicked on CMS. The software ran. Again, bamboozled. Since I reinstalled CMS earlier, I had to configure the software with the dvr (less than 5 minutes) and it worked just fine. I asked the client if that display size was fine and he said it looked great (though back in the day of setting up this system he liked the max size...no comment). So, I left the display size alone at 125% with the screen resolution of 1024 x 768. Which the only difference is between then and now is the display size.
What happened? I don't know. Event viewer didn't tell me anything either. My client is happy, but I'm perplexed about CMS suddenly not recognizing that Windows did have the correct resolution for the software and that the software worked fine for many months with the 150% text display.
To any readers: thoughts?
Yesterday, I received a call from one of the clients. He told me when he clicked on the CMS icon a window appeared with a message "screen resolution must be at least 1024 x 768." I asked him to please check his resolution, walked him through that process and, no surprise, found out his monitors (he has two) both have that resolution. I'm not far from the client so I just made the walk over to his office. I checked the resolution to just knock that off my troubleshooting list and I couldn't believe that CMS still wouldn't run. I was truly bamboozled. Windows screen resolution is 1024 x 768, but CMS wouldn't run because the resolution had to at least be 1024 x 768? Confusing. It was just confusing.
He has an nvidia video card with a control panel. So, I checked that just out of curiosity and obviously the resolution there matched Windows. I checked the Windows Update history. He said CMS worked just fine Friday. Their systems do windows updates over the weekend, so I thought maybe there had been a big update or something. The only update over the weekend was an update for Windows Defender. To my knowledge, that wouldn't have anything to do with my problem. After drumming my fingers for a little bit, I decided to reinstall the software sine it's a simple install. I reinstalled the software hoping that would fix the issue. It didn't. I truly didn't know what to do. Trying not to panic, I went through my history list with this system (these are very helpful) and found that when setting up the system I enlarged the display text to the maximum size, which is 150%. I checked the text size and it was still set to 150%. I turned it down to medium 125%, logged off then logged back in and clicked on CMS. The software ran. Again, bamboozled. Since I reinstalled CMS earlier, I had to configure the software with the dvr (less than 5 minutes) and it worked just fine. I asked the client if that display size was fine and he said it looked great (though back in the day of setting up this system he liked the max size...no comment). So, I left the display size alone at 125% with the screen resolution of 1024 x 768. Which the only difference is between then and now is the display size.
What happened? I don't know. Event viewer didn't tell me anything either. My client is happy, but I'm perplexed about CMS suddenly not recognizing that Windows did have the correct resolution for the software and that the software worked fine for many months with the 150% text display.
To any readers: thoughts?
Friday, November 30, 2012
Excellent Group Policy How-To
I've been testing Window Server 2012 via the "Early Experts" class, which is a very cool class, and experienced this very informative, super user-friendly TechNet how-to article on Group Policy. I'm not a GP guy. What I mean by that is that my job doesn't require a deep understanding of GP, only a foundational level understanding of GP, so I don't know the really cool things you can do with GP for your network(s). After going through this how-to for Server 2012 I now understand some deeper things about GP.
The how-to is for Server 2003, but it works for Server 2012 at least for the part we are at in Administering GP.
Check it out here.
I highly suggest going through, at your own pace, the Windows Server 2012 Early Experts challenge.
The how-to is for Server 2003, but it works for Server 2012 at least for the part we are at in Administering GP.
Check it out here.
I highly suggest going through, at your own pace, the Windows Server 2012 Early Experts challenge.
Wednesday, October 24, 2012
Resources on Windows 8
It's coming. Two days until it's here. What am I talking about? Why, I'm talking about Windows 8. It's a sexy beast and you're going to need to know about it because it's the next big thing.
Windows 8 Resources
Free ebook from Microsoft Press: Introducing Windows 8
Free videos from Total Seminars' Mike Myers on Windows 8
My IT Forum's best Windows 8 Resources
Enjoy!
Windows 8 Resources
Free ebook from Microsoft Press: Introducing Windows 8
Free videos from Total Seminars' Mike Myers on Windows 8
My IT Forum's best Windows 8 Resources
Enjoy!
Tuesday, October 23, 2012
My internet broke! What do I do?

You've heard it many times. You get the call from an employee, family member, or friend (sometimes all three-shudder) telling you something like, "I can't get on the internet. Help!" This will vary depending on your crisis stricken caller's techie-ness, of course, but they're basically telling you, "Hey, my internet is broke. Fix it. Now. I need to check my [insert preferred social media site here], then my email, then youtube to watch funny animals and people falling down, then some gossip columns, then amazon."
What do you do?
I remember in college and during my CompTIA studies that the number one, most important thing you do before anything else is interrogate the person you're helping. What were you doing when this happened? What was the last program you used? Did you hear any noises? Did any error messages pop up on the screen? And so on. That's important, sure, but that kind of approach really depends on the person doesn't it? In my experience the bulk of persons tell me what they can't do and then leave me. I used to try and ask questions, but those questions got me nowhere fast or slow. My approach is to ask the person what they can't do and what they want to be able to do. Quick. Simple. Then the person can leave while I try to make that happen.
To fix the "internet is broke" problem we'll make a list. This list I use at for home users and business users.
Determine environment
Is this PC a member of a domain? Is it a type of server? Is it workgroup PC? Is it a stand-alone PC? This is the number one thing to find out. If it's a stand-alone PC then you won't have to go through as many tasks as a PC that is a member of an active directory domain, right?
Renew the IP address
First and foremost, the easiest fix may be renewing the IP address if it's a device that utilizes DHCP. To determine if it is go the command prompt ( start, run cmd.exe for XP users, start search cmd, click on cmd for vista and above users) and enter the following command: ipconfig /all Look for the word 'DHCP Enabled' You should see to the right of that a 'Yes' or 'No.'
If DHCP is enabled, then run the following commands while still in the command prompt: ipconfig /release then ipconfig /renew This could fix the problem
Flush the DNS cache
DNS is darn important for web browsing. Let me say that again: DNS is darn important for web browsing. When a person looks up sites on the internet your device keeps a record of the DNS "stuff" for that site in some files on your device for quicker lookup time when you visit the site again. Sometimes, the DNS information (cache for us techies) stored on your device can get "messed up" (corrupted, no longer valid information) and this can cause you to not be able to visit certain sites. Well, this can be fixed. While a simple reboot can do the trick, entering following command at the command prompt is quicker: ipconfig /flushdns If successful the cmd prompt will return the following: Windows IP Configuration Successfully flushed the DNS Resolver Cache
Now, this method will work for a stand-alone PC, but what if the PC is a networked PC? For example, if it's a PC connected to a router. Well, the router also has a DNS cache. If that is corrupted, then it needs to be fixed. Reboot (turn off, then turn on) the router to fix the problem.
What if the PC is connected to a domain that has a DNS Server? The DNS server also has a DNS cache. How do you clear the DNS cache on a Windows DNS server?
- Open DNS in your Windows Server
- In the tree click on the DNS server(s)
- On the action menu (or right clicked menu), click clear cache.
These steps work for IE 7, 8, and 9.
In IE, go to Tools > Options
The Options windows opens. Click on Advanced. You should see a Reset button in the lower right portion of the window under a heading that reads, "Reset Internet Explorer Settings." Click on the Reset button.
In the Reset Internet Explorer Settings Dialog box, click on the Reset button.
After a little bit, IE will be return to the default state.
Dive Into the Windows firewall configuration
For Windows 7 users, click start and in the search bar type 'windows firewall' then click enter. For Windows XP users go to control panel then find Windows Firewall.
Try disabling rules/exceptions one at a time, checking internet searching after disabling each one. You might find that a certain rule/exception is blocking internet all together or certain sites.
Reset TCP/IP
If you can't connect to the internet, the TCP/IP protocol may be corrupted. If it is, then you'll need to reset this protocol using the netsh utility via command prompt logged in as an admin.
1. Open command prompt as an admin (start, run cmd.exe for XP users, start search cmd, right click cmd, run as admin for vista and above users).
2. At the command prompt, enter the following command and then press ENTER: netsh int ip reset c:\resetlog.txt By the way, you don't have to specify a directory path for the log file. If you don't want to, drop the "c:\" from the "resetlog.txt" portion of the command.
3. Reboot the computer.
Repair Winsock
If resetting TCP/IP didn't work, for example, if you're still getting "page cannot be displayed" when trying to access a site, or if Filezilla isn't working correctly then it may be a Winsock problem. Run the following command in command prompt as an admin to repair winsock netsh winsock reset catalog After repairing winsock (you're taking it back to default configurations) you may, MAY, have to reinstall services that use winsock.
Reset the default hosts file *copied and pasted from Microsoft*
To reset the Hosts file back to the default, follow these steps:
- Click Start, click Run, type %systemroot% \system32\drivers\etc, and then click OK.
- Rename the Hosts file to Hosts.old.
- Create a new default hosts file. To do this, follow these steps:
- Right-click an open space in the %WinDir%\System32\Drivers\Etc folder, point to New, click Text Document, type hosts, and then press Enter.
- Click Yes to confirm that the file name extension will not be .txt.
- Open the new Hosts file in a text editor. For example, open the file in Notepad.
- Copy the following text to the file:
For Windows XP or for Windows Server 2003For Windows Vista or for Windows Server 2008# Copyright (c) 1993-1999 Microsoft Corp. # # This is a sample HOSTS file used by Microsoft TCP/IP for Windows. # # This file contains the mappings of IP addresses to host names. Each # entry should be kept on an individual line. The IP address should # be placed in the first column followed by the corresponding host name. # The IP address and the host name should be separated by at least one # space. # # Additionally, comments (such as these) may be inserted on individual # lines or following the machine name denoted by a '#' symbol. # # For example: # # 102.54.94.97 rhino.acme.com # source server # 38.25.63.10 x.acme.com # x client host 127.0.0.1 localhost
For Windows 7# Copyright (c) 1993-2006 Microsoft Corp. # # This is a sample HOSTS file used by Microsoft TCP/IP for Windows. # # This file contains the mappings of IP addresses to host names. Each # entry should be kept on an individual line. The IP address should # be placed in the first column followed by the corresponding host name. # The IP address and the host name should be separated by at least one # space. # # Additionally, comments (such as these) may be inserted on individual # lines or following the machine name denoted by a '#' symbol. # # For example: # # 102.54.94.97 rhino.acme.com # source server # 38.25.63.10 x.acme.com # x client host 127.0.0.1 localhost ::1 localhost
# Copyright (c) 1993-2006 Microsoft Corp.
#
# This is a sample HOSTS file used by Microsoft TCP/IP for Windows.
#
# This file contains the mappings of IP addresses to host names. Each
# entry should be kept on an individual line. The IP address should
# be placed in the first column followed by the corresponding host name.
# The IP address and the host name should be separated by at least one
# space.
#
# Additionally, comments (such as these) may be inserted on individual
# lines or following the machine name denoted by a '#' symbol.
#
# For example:
#
#      102.54.94.97     rhino.acme.com          # source server
#       38.25.63.10     x.acme.com              # x client host

# localhost name resolution is handle within DNS itself.
#       127.0.0.1       localhost
#       ::1             localhost
- Save and then close the file.
If this PC is connected to a network then the problem may very well be another PC or device causing the internet problem. Doing the above suggestions all day long won't fix the issue if another device on the network is the culprit.
Monday, September 17, 2012
Try Everything Before You Quit - How to Reset Internet Explorer
No, this isn't a good philosophy for life, but it is a good philosophy for technology repair.
A client told me she was bringing in her mother's PC for me to fix. Her mom has att.yahoo as her homepage in Internet Explorer 8. Apparently, ATT at Yahoo! has changed the look and feel of their homepage (new code and stuff). Since that change, my client's mom can't access the att.yahoo page. She has the site set as her homepage in IE 8. When she starts IE 8, the infinity circle runs for 5+ minutes (she let it run without closing it out and she said only a tiny picture had loaded after 15 minutes). Well, my client brought in the PC for me to check out. I asked her if she had opened a new tab in IE 8 to try and access another site. She said, "No, I didn't try that." So, that was the first thing I did after booting into Windows.
I was able to open google and do a google search (I searched pizza if you're wondering). I was also able to open Yahoo!. From that, I knew IE 8 wasn't hijacked by a browser hijacker or something else. During the opening of other sites, att.yahoo was still trying to load. I closed the att.yahoo tab, then I installed Firefox, ran it, and was able to access att.yahoo just fine in Firefox. My assumption that IE 8 was "just old" and that att.yahoo's new homepage was too "advanced" for IE 8 was beginning to be a reality for me.
I told my client that Firefox loaded site just fine and that IE 9 probably would too. I asked her if she wanted me to update IE 8 to 9. She gave me the green light because she thought IE 9 would at least be more familiar to her mom than Firefox and I thought that was probably true. So, I installed IE 9. Guess what? IE 9 had trouble loading the new homepage too. What? Honestly, I was stumped. Another thought came to mind though. Perhaps IE was broken in some way? Maybe a reset would fix this issue? So that's what I did. I ran the IE reset. Guess what? Att.yahoo loaded just fine, even the same speed as Firefox. I don't know what specifically the problem was between IE and att.yahoo's new homepage, but I do know running the IE reset fixed the issue. I wonder if the IE reset in IE 8 would have fixed the issue for 8? That question ties in the title post that you should try everything before you quit on the technology you're working on. I should have tried the IE reset before upgrading to IE 9.
Want to know how to run the IE reset? These steps work for IE 7, 8, and 9.
In IE, go to Tools > Options
The Options windows opens. Click on Advanced. You should see a Reset button in the lower right portion of the window under a heading that reads, "Reset Internet Explorer Settings." Click on the Reset button.
In the Reset Internet Explorer Settings Dialog box, click on the Reset button.
After a little bit, IE will be return to the default state.
A client told me she was bringing in her mother's PC for me to fix. Her mom has att.yahoo as her homepage in Internet Explorer 8. Apparently, ATT at Yahoo! has changed the look and feel of their homepage (new code and stuff). Since that change, my client's mom can't access the att.yahoo page. She has the site set as her homepage in IE 8. When she starts IE 8, the infinity circle runs for 5+ minutes (she let it run without closing it out and she said only a tiny picture had loaded after 15 minutes). Well, my client brought in the PC for me to check out. I asked her if she had opened a new tab in IE 8 to try and access another site. She said, "No, I didn't try that." So, that was the first thing I did after booting into Windows.
I was able to open google and do a google search (I searched pizza if you're wondering). I was also able to open Yahoo!. From that, I knew IE 8 wasn't hijacked by a browser hijacker or something else. During the opening of other sites, att.yahoo was still trying to load. I closed the att.yahoo tab, then I installed Firefox, ran it, and was able to access att.yahoo just fine in Firefox. My assumption that IE 8 was "just old" and that att.yahoo's new homepage was too "advanced" for IE 8 was beginning to be a reality for me.
I told my client that Firefox loaded site just fine and that IE 9 probably would too. I asked her if she wanted me to update IE 8 to 9. She gave me the green light because she thought IE 9 would at least be more familiar to her mom than Firefox and I thought that was probably true. So, I installed IE 9. Guess what? IE 9 had trouble loading the new homepage too. What? Honestly, I was stumped. Another thought came to mind though. Perhaps IE was broken in some way? Maybe a reset would fix this issue? So that's what I did. I ran the IE reset. Guess what? Att.yahoo loaded just fine, even the same speed as Firefox. I don't know what specifically the problem was between IE and att.yahoo's new homepage, but I do know running the IE reset fixed the issue. I wonder if the IE reset in IE 8 would have fixed the issue for 8? That question ties in the title post that you should try everything before you quit on the technology you're working on. I should have tried the IE reset before upgrading to IE 9.
Want to know how to run the IE reset? These steps work for IE 7, 8, and 9.
In IE, go to Tools > Options
The Options windows opens. Click on Advanced. You should see a Reset button in the lower right portion of the window under a heading that reads, "Reset Internet Explorer Settings." Click on the Reset button.
In the Reset Internet Explorer Settings Dialog box, click on the Reset button.
After a little bit, IE will be return to the default state.
Monday, August 20, 2012
Windows 8 Shortcut Keys and Start Screen Editing
Stepping Into The Windows 8 Pool Part 2
Ah yes. You feel the breeze? It's nice isn't it? The water is feeling good. You're relaxed just hanging out on the steps in the shallow end of the pool when suddenly you're beaned in the head with a volleyball. You look around for the attacker and you realize it came from that annoying kid in the pool named "Finance App." You've heard about him. He's annoying. Sticking his tongue out at you. Making jokes and being all financey and stuff. Well, there's something we can do about that. If you cool down, stay calm, and hangout with me for a second I'll let you know how. I'm about to give you a rundown on some Start Screen Basics. Here we go.
La-la-laaaa! Start Screen Basics
In the last post I wrote about some of the popular Start Screen apps that are pinned to the Start Screen by default. These are apps pre-pinned to appeal to a wide audience. There are some apps here that I don't want on my Start Screen. They're annoying. Telling me about Finance stuff I don't care about or how about that useless Sports app (it's useless because it doesn't include the greatest sport of all time - pro wrestling)? Maybe you are interested in those, which is fine. The steps taken to personalize your Start Screen are universal for all apps whatever you decide to keep, remove, or add. Before we get into that though, we need to learn how to maneuver around the Start Screen first.
Windows 8 Keyboard Shortcuts
TechRepublic blogger Greg Shultz released a Windows 8 keyboard shortcut cheatsheet that included 100, count'em 100, keyboard shortcuts for Windows 8. I'm not going to list all 100 here in this post, but do know that you can download the PDF by clicking here or on the link provided at the end of this post.
Most people love shortcuts. I can't think of a better place to use shortcuts than in a computer because, let's face it, we don't want to take the long way clicking through a long breadcrumb-trail when a simple and fun shortcut can get us there quicker. In this post I'll go over my favorite (since they're my favorite I just know they'll be your favorite) Windows 8 keyboard shortcuts for maneuvering around the Start Screen and then a few more that will be handy for other tasks. So, strap on your seatbelt, ease your seat back, and put into gear because we're about to take off. (was that overly cheesy?)
! note: In case you don't know where the windows key is on the keyboard check out this image

1. Windows Key (from here on WK) = Switch between Metro Start Screen and last accessed app
2. WK + C = Access the Charms bar
3. WK + I = Access the Settings Charm
4. WK + K = Access Devices Charm
5. WK + Q = Access Apps Search Screen
6. WK + F = Access Files Search Screen
7. WK + X = Access Windows Tools Menu
8. WK + E = Open My Computer
9. ESC = Close a Charm
10. WK + CTRL + B = Access a program that is displaying a message in the Notifications Area
Bonus (these aren't for maneuvering around Start, but they're very helpful shortcuts)
CTRL + A = Highlight/Select All Items
CTRL + C = Copy the selected item
CTRL + V = Paste the selected item
CTRL + X = Cut the selected item
CTRL + D = Delete the selected item
CTRL + Z = Undo action
While the entire list is worth checking out, the above shortcuts are ones I highly recommend committing to memory because you'll be accessing these places often and learning the above shortcuts will help you be more efficient. Now, let's personalize this sucker.
Personalization
Now we're into the subjective side of things. I'll go over trimming and expanding the "stuff" on your Start Screen then color and design.
Right-click on one of your large apps (by large I mean rectangle) and look at the options that appear at the bottom of your screen. You have the option to make the app smaller. Click on "smaller" and see what happens. Da-da! It's now a square instead of a rectangle. Right-click on the same app and now the option to make it larger is available.
Now, let's eliminate some of the apps that will never be used on the Start Screen. For my experience, the app I'll unpin for this example will be the finance app and a few others I know I won't use. Right-click on the Finance app. The options available are: unpin from start, uninstall, smaller, and turn live tile off. It's not taking up too much space and there's a possibility I might want to use it in the future so I'll just unpin it from the Start Screen. If I knew for certain I wouldn't ever use it then I would have went with uninstall. To add an app to the Start Screen there are a few ways. I will go with the "from the Start Screen..." way since this section is on the Start Screen. Right-click in a blank area. Click on "all apps" to show all the apps. Right-Click on "command prompt" for this example and look at the options below. Click on "pin to start." Now click the WK to go back to the start screen. Hey check it out! Our app is on the Start Screen. If it's not in the location you want it to be in then click and hold the app and drag it to the position you want it on your Start Screen. Personally, I moved the desktop tile to the top left of the tile arrangements so when I boot up I can just press enter to start the desktop. Tweak the app tiles to what you like.

Let's go over color and background design. Use the key combination to bring up the charm settings (WK+I if you forgot) then click on "Change PC Settings." Once the window opens, click on "start screen." Now, you can change the background design and color of your Start Screen. When you've decided on your choices, go back to the Start Screen by pressing the WK.

There are still some personalization tips I want to go over, but I'll do that in the next post since this one is going on a little bit too long.
Related Post
Stepping into the Windows 8 Pool
Thursday, August 16, 2012
Stepping into the Windows 8 pool part 1
This is the first post in a series of posts on what I call "stepping into the Windows 8 pool." The water is a little cold, but once you get in slowly, move around the shallow end for a little bit, eventually you'll wade out into the deep end and appreciate the Windows 8 pool. I promise the water isn't as murky as what your Windows 8 naysayer friends tell you. It's fresh. It's clean. Hey, there's even a guy up on the side of the pool grilling a few hot dogs and hamburgers for you when you get hungry after a few laps of swimming. So suit up (or suit down if you're frisky) and step into the pool. I'll be there holding your hand as you step in, well, maybe I won't hold your hand, but rest assure I'll be there to laugh at--er--help you if you fall in on your way down the steps.
You're looking around the pool. You see the people splashing, laughing, and having a good time. The entire scene at first glance looks fun and it's drawing you in, but after a longer stare you do notice a few things that look, well, odd like the overweight lady wearing the g-string bikini (not that there's anything wrong with that), that "one" guy wearing a thong, and the two-headed dog (what? How is that possible?); that's Windows 8 my friend. At first glance it looks beautiful, fun, and the Siren's song is luring you in. I'm not saying Windows 8 isn't beautiful and fun, but after a longer look there are few things that some folks might find odd for a Windows system. Just like the odd sights at the pool, the odd things with Windows 8 are indeed odd at first, however, after a while they're fun, entertaining and you want to keep them around. What do you notice first about Windows 8? If you're like me, you notice the funky screen with tiles all over the place! What's up with that? Well, that's the "start" screen. The Start screen has replaced the traditional start button. It's true, it's true. The Start button is no more. In Windows 8 the Start button has transformed into the Start screen. Love it or hate it, the Start screen is here and it's actually not that bad of an idea considering most people are used to a tile screen of some flavor because of smartphones. Whatever smartphone you use (Windows phone, Android, Apple) you're "home" screen or "start" screen is a collection of your apps represented as some kind of icon or tile, which is what Microsoft has done with their start screen. I think of it as an approach at integrating the user's devices which is something I'll go over later on in this series.
When Windows 8 has booted to the start screen for the first time you're looking at the default tile arrangement. The tiles can be customized, but before I go into the steps of deleting and adding tiles and the basics of the Start Screen I want to go over some of the tiles that are there by default.

When first clicked, you'll be asked to type in your Microsoft account (hotmail/live email and password). This is the account Windows 8 will use to sync your email, calendar, and people data with its Mail, Calendar, and People apps. After setup, you'll be taken to the Mail app. The design and feel is the same kind of design and feel that runs through all of Windows 8: simple, functional and stylish. Microsoft took a simplistic approach with this OS and I like it. The layout is traditional of most Mail apps: mail folders on the left, collection of mail in the selected folder in the middle, then the opened email on the right. When an email is selected, you have three options in the top right: new (a plus sign), respond (a left arrow and enveolope), and delete (a trash can). If you right-click the bottom of the screen some options emerge: move (move the selected email to another folder), pin-to-start, sync, and mark as unread.
I personally think this app is very cool. I first used it on my Windows Phone and fell in love with it. Once in the app, you'll see a listing of your "people," i.e. your collected contacts from email and social sites. Depending on how you're synced, there will be different data visible. There are three headings: people, what's new, and me. At the far left is a sidebar with different accounts that you're connected to and/or you can connect to, e.g. facebook, twitter, outlook. I want to stop talking specifically about the people app here and note that if you want to go back to an app screen hover your mouse in the very top left of the app screen you're in until you see a small square of the previous app and then click on it; you'll be taken to the previous app. Cool huh? OK, back to the people app. Clicking on a person's name/picture will bring up their profile. Depending on your synced is what you'll see. You'll have options such as: send email, write on wall, etc. Whatever the person shares on social sites will be visible here in the profile, which is interesting. Wondering when person a's birthday is? Well if said person has shared it on a social site and you have 8 synced with that social site you'll be able to find out by going to the People App. Right-clicking the People App will bring up options down south like add a new contact and an option to show contacts who are online only, which means just show contacts who've been added from your synced accounts instead of contacts you've added manually and locally.

The What's New section displays a newsfeed of all the latest and greatest from your people's updates from all of the social feeds you're synced and they're synced with. It's good stuff indeed. The Me section is your profile. Whatever you've shared on social sites or on your Microsoft Account will appear here. The right-click function is an edit feature which will take you to Windows Live for editing.
This App will sync whatever communication apps you allow it too, e.g. Facebook chat, Messenger, etc. This is where you can chat with your pals about the new stuff in whatever it is you and your pals chat about. The right-click function here gives the following options: set chat status, invite, and new message.
This tile is an excellent tool. Windows 8's calendar is an above average calendar tool to say the least. The default view is of course the month view. To maneuver around the calender you can scroll and right click to change from month, to day, or to week. Also, right clicking returns the option to add a new event. When "new" is clicked you're taken to a new screen where you can make the details of the new event.

The Photos Tile is, obviously, a hub for all of your pictures locally and online (Facebook, skydrive, Flickr, etc.). The right-click function for this app is simple: import. The default tiles in this app for accessing photos are: pictures library (photos stored locally on your PC), Skydrive photos, Facebook photos, Flickr photos, and a tile called Device (add laptop, phone, TV).

I really like the photo viewer in Windows 8. Want to see all of your photos in a slideshow? 8 does that well. I really like 8's thumbnail view. Since Windows 8 is designed for landscape, the thumbnail viewer is oriented that way too, but 8 doesn't make each thumbnail a square, instead it displays the picture in the orientation it was taken which is very cool. The Photos app is a powerful app in Windows 8. You can sit back and watch your vacation photos on your TV if you want (this also works for movie maker).
Video and Music Apps
If you're used to the Xbox 360 then you'll be comfortable with these apps on windows 8. The right-click function on the home screen of the video/music app gives you "media player" controls and a open file option to open media files. If you have your Microsoft/Live account synced then you can watch videos you've purchased and preview videos. You don't need an account to watch video previews.
 The far left sidebar is the hub for your videos stored locally on your PC or storage device.
The rest of the apps available by default are: weather, Internet Explorer, Maps, Store (the Windows Marketplace), Skydrive, Xbox live games, camera (webcam), Finance, Sports, Travel, and News. Yes, these apps are interesting, but they're mostly self-explanatory and function much like the apps I described above. Right-clicking almost always provides further options. So, click on these apps, explore and enjoy.
The next post is going to be much more interesting as we inch a little further in the pool to learn the basics of the start screen.
First Look
You're looking around the pool. You see the people splashing, laughing, and having a good time. The entire scene at first glance looks fun and it's drawing you in, but after a longer stare you do notice a few things that look, well, odd like the overweight lady wearing the g-string bikini (not that there's anything wrong with that), that "one" guy wearing a thong, and the two-headed dog (what? How is that possible?); that's Windows 8 my friend. At first glance it looks beautiful, fun, and the Siren's song is luring you in. I'm not saying Windows 8 isn't beautiful and fun, but after a longer look there are few things that some folks might find odd for a Windows system. Just like the odd sights at the pool, the odd things with Windows 8 are indeed odd at first, however, after a while they're fun, entertaining and you want to keep them around. What do you notice first about Windows 8? If you're like me, you notice the funky screen with tiles all over the place! What's up with that? Well, that's the "start" screen. The Start screen has replaced the traditional start button. It's true, it's true. The Start button is no more. In Windows 8 the Start button has transformed into the Start screen. Love it or hate it, the Start screen is here and it's actually not that bad of an idea considering most people are used to a tile screen of some flavor because of smartphones. Whatever smartphone you use (Windows phone, Android, Apple) you're "home" screen or "start" screen is a collection of your apps represented as some kind of icon or tile, which is what Microsoft has done with their start screen. I think of it as an approach at integrating the user's devices which is something I'll go over later on in this series.
The Start Screen
When Windows 8 has booted to the start screen for the first time you're looking at the default tile arrangement. The tiles can be customized, but before I go into the steps of deleting and adding tiles and the basics of the Start Screen I want to go over some of the tiles that are there by default.

The Mail App
When first clicked, you'll be asked to type in your Microsoft account (hotmail/live email and password). This is the account Windows 8 will use to sync your email, calendar, and people data with its Mail, Calendar, and People apps. After setup, you'll be taken to the Mail app. The design and feel is the same kind of design and feel that runs through all of Windows 8: simple, functional and stylish. Microsoft took a simplistic approach with this OS and I like it. The layout is traditional of most Mail apps: mail folders on the left, collection of mail in the selected folder in the middle, then the opened email on the right. When an email is selected, you have three options in the top right: new (a plus sign), respond (a left arrow and enveolope), and delete (a trash can). If you right-click the bottom of the screen some options emerge: move (move the selected email to another folder), pin-to-start, sync, and mark as unread.
The People App
I personally think this app is very cool. I first used it on my Windows Phone and fell in love with it. Once in the app, you'll see a listing of your "people," i.e. your collected contacts from email and social sites. Depending on how you're synced, there will be different data visible. There are three headings: people, what's new, and me. At the far left is a sidebar with different accounts that you're connected to and/or you can connect to, e.g. facebook, twitter, outlook. I want to stop talking specifically about the people app here and note that if you want to go back to an app screen hover your mouse in the very top left of the app screen you're in until you see a small square of the previous app and then click on it; you'll be taken to the previous app. Cool huh? OK, back to the people app. Clicking on a person's name/picture will bring up their profile. Depending on your synced is what you'll see. You'll have options such as: send email, write on wall, etc. Whatever the person shares on social sites will be visible here in the profile, which is interesting. Wondering when person a's birthday is? Well if said person has shared it on a social site and you have 8 synced with that social site you'll be able to find out by going to the People App. Right-clicking the People App will bring up options down south like add a new contact and an option to show contacts who are online only, which means just show contacts who've been added from your synced accounts instead of contacts you've added manually and locally.

The What's New section displays a newsfeed of all the latest and greatest from your people's updates from all of the social feeds you're synced and they're synced with. It's good stuff indeed. The Me section is your profile. Whatever you've shared on social sites or on your Microsoft Account will appear here. The right-click function is an edit feature which will take you to Windows Live for editing.
Messaging App
This App will sync whatever communication apps you allow it too, e.g. Facebook chat, Messenger, etc. This is where you can chat with your pals about the new stuff in whatever it is you and your pals chat about. The right-click function here gives the following options: set chat status, invite, and new message.
Calendar App
This tile is an excellent tool. Windows 8's calendar is an above average calendar tool to say the least. The default view is of course the month view. To maneuver around the calender you can scroll and right click to change from month, to day, or to week. Also, right clicking returns the option to add a new event. When "new" is clicked you're taken to a new screen where you can make the details of the new event.

Photos App
The Photos Tile is, obviously, a hub for all of your pictures locally and online (Facebook, skydrive, Flickr, etc.). The right-click function for this app is simple: import. The default tiles in this app for accessing photos are: pictures library (photos stored locally on your PC), Skydrive photos, Facebook photos, Flickr photos, and a tile called Device (add laptop, phone, TV).

Video and Music Apps
If you're used to the Xbox 360 then you'll be comfortable with these apps on windows 8. The right-click function on the home screen of the video/music app gives you "media player" controls and a open file option to open media files. If you have your Microsoft/Live account synced then you can watch videos you've purchased and preview videos. You don't need an account to watch video previews.

...And the Rest
The rest of the apps available by default are: weather, Internet Explorer, Maps, Store (the Windows Marketplace), Skydrive, Xbox live games, camera (webcam), Finance, Sports, Travel, and News. Yes, these apps are interesting, but they're mostly self-explanatory and function much like the apps I described above. Right-clicking almost always provides further options. So, click on these apps, explore and enjoy.
The next post is going to be much more interesting as we inch a little further in the pool to learn the basics of the start screen.
Wednesday, August 15, 2012
Changing PC Settings in Windows 8
Windows 8 will be released October 26, so I thought I would get some of my "to-do" guides here on the blog. I've been testing Windows 8 at work for quite some time now and I haven't ran into any production issues yet. Our production apps run just fine in Windows 8, the only hurdle we'll have (should we decide to use it - we actually have no "need" to upgrade) is user training because Windows 8 is so, so, so different in functionality than previous Windows systems. Anyway, this blog post is on getting to and changing PC settings in Windows 8.
1. When booted into Windows 8, click on the desktop tile.
2. When in the desktop, lower your mouse pointer to the bottom right and wait just a second. A sidebar should appear with icons like "search," "devices," etc.

3. Click on settings. After clicking on settings, a turquoise sidebar will appear with various options. Choose "change PC settings"

4. Now you should see the beautiful PC Settings area for Windows 8. There are many settings to configure.

5. Personalize
You have the option of changing settings for the lock screen, start screen and your account picture. Under lock screen, you can change the lock image from a decent amount of images preloaded on Windows 8 or from your own collection of images. The choice is yours, though it's difficult to beat the gorgeous images that come with Windows 8.
You can also change lock screen apps. These are apps that run in the background and will continue to give you updates while in "locked" mode, e.g. the email app will give you a notification of a new email on your lock screen. The three that run in the background by default are: instant messaging, email, and calendar. You can add more. Some even have the option of giving a detailed status like the calendar app.
Start Screen. The settings for this deal with the background art for the start screen and the color. By default the color is turquoise and has the circle art. You have 6 choices to choose from for the background of the start screen: 5 designs and then the option of no design. The color options offer a healthy amount of choices.
Account Picture. Not much to see here. There is the "browse" button for choosing from pictures currently installed on your PC or you can create an account picture if you have a webcam by using the webcam app.
6. Users
This section deals with user settings for the PC: local and domain. If you're connected to a domain, then you many or may not have privilege to change your domain user settings depending on your domain policies. The first button we see is "connect your Microsoft account" which if chosen will sync your domain settings with your Microsoft account settings. I'm not entirely sure on how this works yet. I've read different things, but my theory is that web-facing apps you personally use will utilize your Microsoft account settings while domain stuff like group policy and such will utilize your domain settings allowing the two settings to work harmoniously together.
The "manage domain users" stuff works like windows 7. When clicked, you will be taken to desktop mode to tinker around with the domain users for the PC. You can also add a user here. When clicked you will be taken through the "add a user" wizard.
7. Notifications
This is a simple section. You can turn on and off notifications for apps and whether notifications are shown at all or in lock screen or heard.
8. Search
You can choose how search works. Turn on or off features like "show the apps I search most often at the top" and "let windows save my searches as future search suggestions." You can delete search history and turn on or off the apps you want to use search.
9. Share
This area is limited. The two top options are turn on or off whether you want to see apps most often used at top and show a list of how you share most often. At the bottom you have two apps to choose from for turning on and off their sharing ability: mail and people. Of course, this a fresh install PC. I don't have many apps installed, I'm sure when the list of apps installed grows more will be populated in this "share" list.
10. General
Usually general settings aren't very fun. They are usually confined to date/time, spelling, language, and such and all of that is here in Windows 8's general settings, but there are two very exciting features here in the general settings: refresh your PC without affecting your files and Reinstall Windows. I'm very excited about these two features. The first option "refreshes" your pc without losing, photos, music, and other personal files (system restore?) and the second option is for staring all over - factory fresh. This is very nice.
11. Privacy
Ah yes the privacy settings. Not much to see here. These are turn on or off functions for the following: apps use my location, let apps access my domain info, and let help improve windows store by sending URLs apps use.
12. Devices
This section gives a list of devices connected your PC locally and via the network. You can also add a device here.
13. Ease of Access
In this section there are on/off functions for making the display and audio better for you. Narration is here, length of time notifications are shown, and cursor thickness.
14. Sync Settings
This section is for users who have settings synced between their local/domain account and Microsoft account. There are many options to choose from: personalize, desktop, passwords, ease of access, language, app settings, browser, and other windows settings.
15. Homegroup
This is for home networks. What's shared, what isn't, and privacy stuff.
16. Windows Update
Check for updates, choose your update method.
I didn't include a screenshot for every setting because that would have been overkill I think. I decided to take a text approach. I did include a screenshot of the main PC settings screen and from that you can probably tell how each section will look and feel. I hope this has been helpful.
1. When booted into Windows 8, click on the desktop tile.
2. When in the desktop, lower your mouse pointer to the bottom right and wait just a second. A sidebar should appear with icons like "search," "devices," etc.
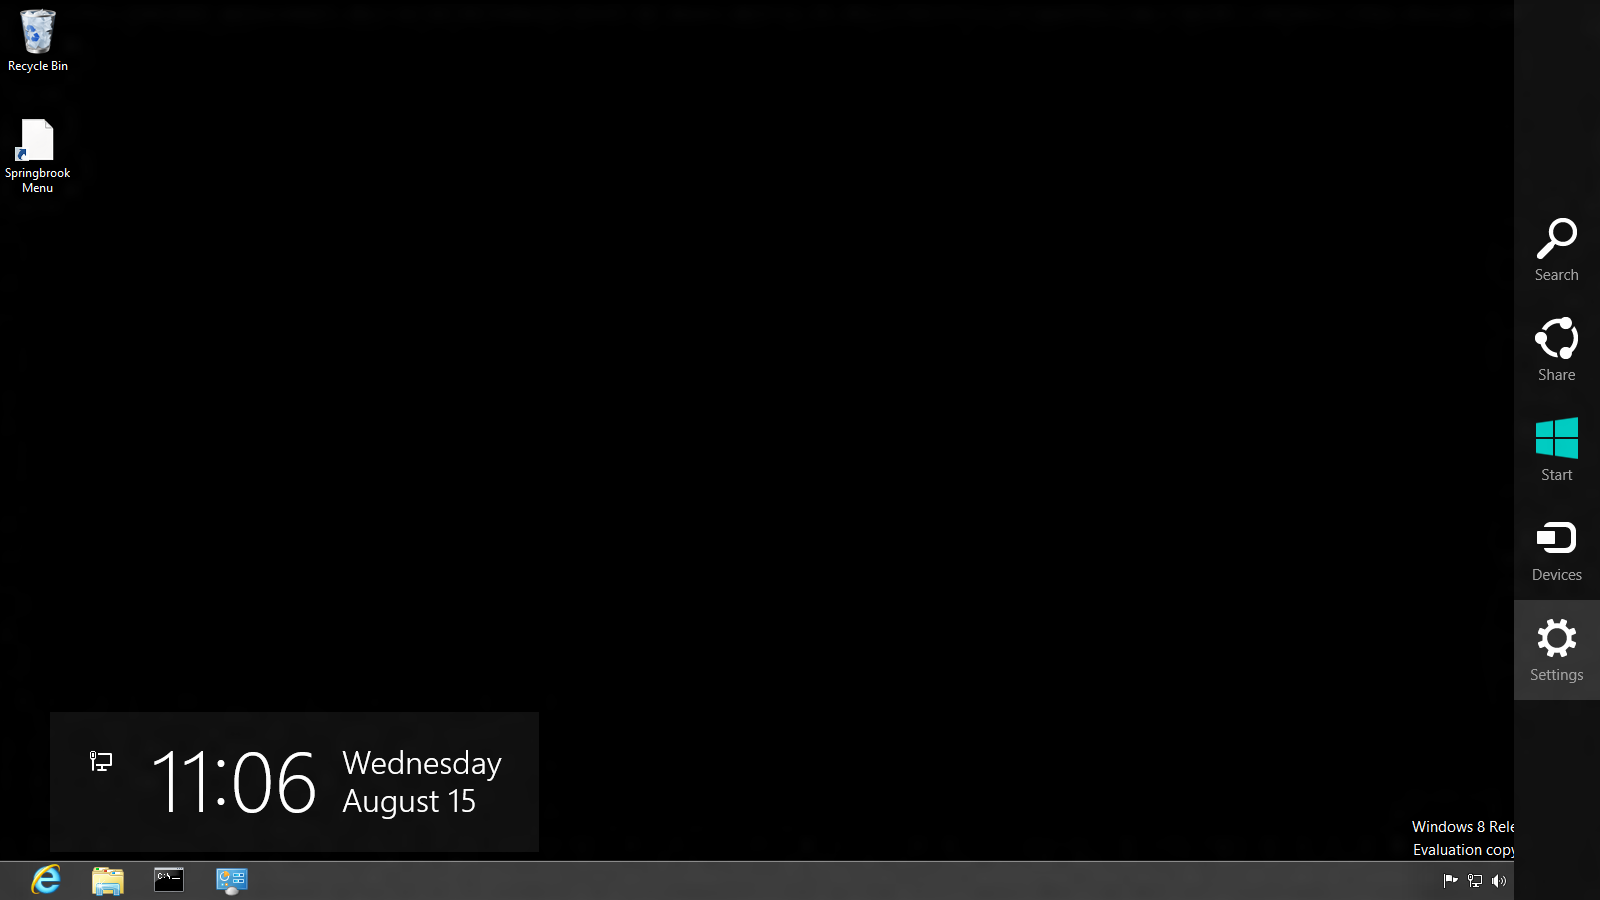
3. Click on settings. After clicking on settings, a turquoise sidebar will appear with various options. Choose "change PC settings"

4. Now you should see the beautiful PC Settings area for Windows 8. There are many settings to configure.
5. Personalize
You have the option of changing settings for the lock screen, start screen and your account picture. Under lock screen, you can change the lock image from a decent amount of images preloaded on Windows 8 or from your own collection of images. The choice is yours, though it's difficult to beat the gorgeous images that come with Windows 8.
You can also change lock screen apps. These are apps that run in the background and will continue to give you updates while in "locked" mode, e.g. the email app will give you a notification of a new email on your lock screen. The three that run in the background by default are: instant messaging, email, and calendar. You can add more. Some even have the option of giving a detailed status like the calendar app.
Start Screen. The settings for this deal with the background art for the start screen and the color. By default the color is turquoise and has the circle art. You have 6 choices to choose from for the background of the start screen: 5 designs and then the option of no design. The color options offer a healthy amount of choices.
Account Picture. Not much to see here. There is the "browse" button for choosing from pictures currently installed on your PC or you can create an account picture if you have a webcam by using the webcam app.
6. Users
This section deals with user settings for the PC: local and domain. If you're connected to a domain, then you many or may not have privilege to change your domain user settings depending on your domain policies. The first button we see is "connect your Microsoft account" which if chosen will sync your domain settings with your Microsoft account settings. I'm not entirely sure on how this works yet. I've read different things, but my theory is that web-facing apps you personally use will utilize your Microsoft account settings while domain stuff like group policy and such will utilize your domain settings allowing the two settings to work harmoniously together.
The "manage domain users" stuff works like windows 7. When clicked, you will be taken to desktop mode to tinker around with the domain users for the PC. You can also add a user here. When clicked you will be taken through the "add a user" wizard.
7. Notifications
This is a simple section. You can turn on and off notifications for apps and whether notifications are shown at all or in lock screen or heard.
8. Search
You can choose how search works. Turn on or off features like "show the apps I search most often at the top" and "let windows save my searches as future search suggestions." You can delete search history and turn on or off the apps you want to use search.
9. Share
This area is limited. The two top options are turn on or off whether you want to see apps most often used at top and show a list of how you share most often. At the bottom you have two apps to choose from for turning on and off their sharing ability: mail and people. Of course, this a fresh install PC. I don't have many apps installed, I'm sure when the list of apps installed grows more will be populated in this "share" list.
10. General
Usually general settings aren't very fun. They are usually confined to date/time, spelling, language, and such and all of that is here in Windows 8's general settings, but there are two very exciting features here in the general settings: refresh your PC without affecting your files and Reinstall Windows. I'm very excited about these two features. The first option "refreshes" your pc without losing, photos, music, and other personal files (system restore?) and the second option is for staring all over - factory fresh. This is very nice.
11. Privacy
Ah yes the privacy settings. Not much to see here. These are turn on or off functions for the following: apps use my location, let apps access my domain info, and let help improve windows store by sending URLs apps use.
12. Devices
This section gives a list of devices connected your PC locally and via the network. You can also add a device here.
13. Ease of Access
In this section there are on/off functions for making the display and audio better for you. Narration is here, length of time notifications are shown, and cursor thickness.
14. Sync Settings
This section is for users who have settings synced between their local/domain account and Microsoft account. There are many options to choose from: personalize, desktop, passwords, ease of access, language, app settings, browser, and other windows settings.
15. Homegroup
This is for home networks. What's shared, what isn't, and privacy stuff.
16. Windows Update
Check for updates, choose your update method.
I didn't include a screenshot for every setting because that would have been overkill I think. I decided to take a text approach. I did include a screenshot of the main PC settings screen and from that you can probably tell how each section will look and feel. I hope this has been helpful.
Subscribe to:
Posts (Atom)